Get ready to indulge in a sweet and salty treat! My No-Bake Salted Caramel Pretzel Cheesecake Cups will amaze your taste buds. With layers of creamy cheesecake, crunchy pretzel crust, and rich caramel, these cups are perfect for any occasion. Plus, they’re quick to make—no baking required! Let’s dive into the fun of creating this delightful dessert. You won’t want to miss it!
Ingredients
List of Required Ingredients
To make these delightful no-bake salted caramel pretzel cheesecake cups, you need:
– 1 cup crushed pretzels
– 1/4 cup unsalted butter, melted
– 2 tablespoons brown sugar
– 8 oz cream cheese, softened
– 1/2 cup powdered sugar
– 1 teaspoon vanilla extract
– 1 cup heavy whipping cream
– 1/2 cup caramel sauce
– Sea salt, for garnish
Ingredient Substitutions
You can swap items in this recipe for a lighter twist or preference. Here are some ideas:
– Use gluten-free pretzels if you need a gluten-free option.
– Replace cream cheese with Greek yogurt for a tangy and lighter flavor.
– Try coconut cream instead of heavy whipping cream for a dairy-free choice.
– For a lower sugar option, use a sugar substitute in the cheesecake filling.
Equipment Needed
Gathering the right tools makes cooking easier. You will need:
– Mixing bowls
– Muffin tin
– Cupcake liners
– Hand mixer or stand mixer
– Spatula
– Measuring cups and spoons
– Refrigerator for chilling the cups
With these ingredients and tools, you are ready to create a tasty treat that everyone will love!
Step-by-Step Instructions
Preparing the Pretzel Crust
To make the pretzel crust, start by crushing the pretzels. You want small pieces, but not powder. I use a zip-top bag and a rolling pin. It’s fun to smash them!
Next, mix the crushed pretzels with melted butter and brown sugar in a bowl. Stir until it looks like wet sand. This mix adds crunch and sweetness.
Line a muffin tin with cupcake liners. Spoon the pretzel mix into each liner. Press it down firmly. This helps it hold together. Place the tin in the fridge for about 15 minutes. This time helps the crust set and firm up.
Making the Cheesecake Filling
Now, let’s make the cheesecake filling. In a clean bowl, beat the softened cream cheese, powdered sugar, and vanilla extract. Mix until it’s smooth and creamy. This step is key; it makes the filling rich.
In another bowl, whip the heavy cream until it forms stiff peaks. This means it holds its shape well. Carefully fold the whipped cream into the cream cheese mix. Be gentle so it stays fluffy. This gives the cheesecake a light texture.
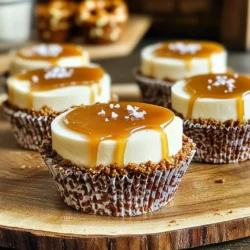
Assembling the Cheesecake Cups
Take the muffin tin out of the fridge. Spoon the cheesecake filling over each pretzel crust. Smooth the tops with a spatula for a nice finish.
Now, drizzle caramel sauce over each cup. This adds sweetness and that lovely caramel flavor. Finally, sprinkle a pinch of sea salt on top. This brings out the flavors and adds a nice balance.
Refrigerate the cups for at least two hours. This allows them to set well. Before serving, add extra caramel and some pretzel crumbs on top for a decorative touch. Enjoy!
Tips & Tricks
Achieving the Perfect Texture
To get the best texture, make sure your cream cheese is soft. I let it sit at room temp for about 30 minutes. When you mix it, it should be creamy and smooth. Whip your heavy cream until it forms stiff peaks. This helps the cheesecake stay light and fluffy. When you fold the whipped cream into the cream cheese, do it gently. This keeps air in the mixture. If you mix too hard, it may become runny.
Flavor Enhancements
To boost the flavor, consider adding a bit of lemon juice. A teaspoon of lemon juice brightens the taste. You can also swap the vanilla for almond extract for a nutty twist. For a richer flavor, try using dark caramel sauce instead of regular. If you love chocolate, add cocoa powder to the cream cheese mix. Just remember to adjust the sugar if you add any extra ingredients.
Presentation Suggestions
For a lovely presentation, use colorful cupcake liners. When you serve the cups, place them on a nice platter. Drizzle extra caramel over the tops right before serving. Add a sprinkle of pretzel crumbs for crunch. If you want to impress, top each cup with mini pretzels or edible flowers. This makes your dessert look fancy and fun!

Variations
Flavor Variations
You can change the flavor of your cheesecake cups in fun ways. For a chocolate twist, add cocoa powder to the cream cheese mix. You could also melt some chocolate and mix it in. This will give a rich, chocolatey taste. If you love peanut butter, try mixing in creamy peanut butter instead of some cream cheese. This will add a nutty flavor that pairs well with the caramel. You can even top the cups with crushed peanuts for extra crunch.
Healthier Substitutes
Want to make this dessert lighter? You can use reduced sugar options. Try substituting half the powdered sugar with a sugar alternative. This gives you sweetness without all the calories. For a gluten-free option, swap regular pretzels with gluten-free pretzels. This way, everyone can enjoy these tasty treats. You can also use low-fat cream cheese to cut down on fat while keeping the creamy texture.
Different Serving Styles
You can serve these cheesecake cups in many ways. If you want to impress guests, try layering the ingredients in clear cups. Start with the crust at the bottom, then add the cheesecake filling, and top it with caramel. This looks beautiful and lets everyone see the layers. If you prefer smaller bites, make mini cups using a mini muffin tin. These are perfect for parties and easy to grab. No matter how you serve them, they will taste amazing!
Storage Info
How to Store
To keep your no-bake salted caramel pretzel cheesecake cups fresh, store them in the fridge. Use an airtight container or cover them with plastic wrap. This will help maintain their creamy texture and rich flavor. They stay fresh for about 3 to 4 days. Just make sure to keep them away from strong smells in the fridge.
Freezing Instructions
You can freeze these cheesecake cups if you need to save some for later. Place them in a freezer-safe container. They last well in the freezer for up to a month. To enjoy them, let them thaw in the fridge overnight. This keeps the texture smooth and creamy.
Best Practices for Freshness
To keep your cheesecake cups tasting great, avoid adding extra toppings until just before serving. This will prevent sogginess. Always check for any signs of spoilage before you eat them. If they smell off or look different, it’s best to toss them. Enjoy your delicious treats while they are fresh!
FAQs
Can I make these cheesecake cups ahead of time?
Yes, you can make these cheesecake cups a day or two ahead. Just store them in the fridge. This way, the flavors blend well, making them even tastier. Just remember to add any toppings right before serving for the best look and taste.
What can I use instead of cream cheese?
If you want a different option, you can use Greek yogurt or mascarpone. Both give a creamy texture. Keep in mind that the flavor might change a little. For a dairy-free option, try using cashew cream or a vegan cream cheese.
How do I prevent the crust from becoming soggy?
To keep your crust crunchy, make sure to press the pretzel mixture tightly into the liner. Use melted butter to bind it well. Also, chill the crust for 15 minutes before adding the filling. This sets the crust and helps maintain its crunch.
Can I use a different type of sweetener?
Yes, you can use different sweeteners. If you prefer less sugar, try stevia or monk fruit. Just remember to adjust the amount, as these sweeteners can be sweeter than regular sugar. Always taste the filling to get the sweetness you like.
Are these cheesecake cups suitable for special diets?
These cheesecake cups can fit many diets. For gluten-free, use gluten-free pretzels. For vegan, replace the cream cheese and whipped cream with plant-based options. Always check the labels to ensure all ingredients meet your diet needs.
The blog post covered all the key steps to make delicious cheesecake cups. You learned about the ingredients, substitutes, and the equipment needed. I shared useful tips for texture, flavor, and presentation. We explored tasty variations and discussed how to store your treats to keep them fresh.
In the end, these cups are fun to make and enjoy. With a few simple changes, you can cater to different tastes and diets. Have fun trying your own ideas!