If you’re craving a dish that’s both flavorful and simple, then this Easy Chicken Kiev recipe is for you. Imagine juicy chicken breasts stuffed with rich, herb-infused butter, then perfectly cooked for a golden crust. Whether you’re a kitchen pro or just starting, I’ll guide you through each step. Get ready to impress your family or serve a delightful meal for yourself! Let’s dive into the tasty details!
Ingredients
Chicken and Butter
– 4 boneless, skinless chicken breasts
– 100g unsalted butter, softened
– Salt and pepper to taste
Fresh Herbs and Flavorings
– 2 tablespoons fresh parsley, finely chopped
– 1 tablespoon fresh dill, finely chopped
– 2 cloves garlic, minced
– 1 teaspoon lemon juice
Breading and Cooking Components
– 1 cup all-purpose flour
– 2 large eggs, beaten
– 2 cups breadcrumbs (panko for extra crunch)
– Oil for frying
In this recipe, we focus on fresh ingredients. The chicken serves as a blank canvas. The unsalted butter adds richness. Fresh herbs elevate the dish with bright flavors. I love using parsley and dill together. Garlic gives a punch, while lemon juice brightens it all.
For the breading, I recommend panko breadcrumbs. They create a crispier texture than regular breadcrumbs. The flour and eggs help the coating stick well. Oil is essential for frying. It creates a golden and crunchy crust.
When I prepare this dish, I make sure to have everything ready. This way, I can cook smoothly and enjoy the process. Each ingredient plays a key role in making this Chicken Kiev flavorful and delightful.
Step-by-Step Instructions
Preparing the Herb Butter
1. In a bowl, mix the softened butter, parsley, dill, minced garlic, lemon juice, salt, and pepper.
2. Make sure everything is well blended.
3. Place the mixture on plastic wrap. Roll it into a log shape, about 1 inch wide.
4. Twist the ends to seal it. Freeze for 30 minutes until firm.
Preparing the Chicken
1. While the butter freezes, take the chicken breasts and lay them flat.
2. Cover the chicken with plastic wrap.
3. Use a meat mallet to pound each breast to about ½ inch thick.
4. This makes them cook evenly.
5. Cut a pocket in the thickest part of each breast. Be careful not to cut through the sides.
Stuffing and Coating the Chicken
1. Remove the herb butter from the freezer.
2. Take a piece of the frozen butter and insert it into each chicken pocket.
3. Fold the chicken over to seal the butter in. Use toothpicks to hold it together if needed.
4. Set up three shallow dishes: one with flour, one with beaten eggs, and one with breadcrumbs.
5. First, dredge the stuffed chicken in flour. Shake off any extra.
6. Next, dip each piece into the egg, coating it well.
7. Finally, roll the chicken in breadcrumbs. Press gently to make sure they stick.
Cooking the Chicken
1. In a large skillet, heat about ½ inch of oil over medium-high heat.
2. Once the oil is hot, carefully add the breaded chicken.
3. Fry each piece for about 5-6 minutes on each side.
4. Cook until golden brown and the inside reaches 165°F (75°C).
Final Preparation
1. Once cooked, transfer the chicken to a plate lined with paper towels.
2. Let the chicken rest for about 5 minutes before serving.
3. This helps the herb butter set and prevents spills when you cut into it.
Tips & Tricks
Ensuring Juicy Chicken
To make juicy Chicken Kiev, pound the chicken evenly. This step helps the meat cook at the same rate. You want it to be about ½ inch thick. This way, the chicken stays tender and juicy inside. After cooking, check the internal temperature. It should reach 165°F (75°C) to ensure safety and perfect doneness. Use a meat thermometer for accuracy.
Achieving Crispy Coating
For a crispy coating, use panko breadcrumbs. They add a nice crunch that regular breadcrumbs can’t match. Heat your oil to the right temperature. If it’s too hot, the coating burns. If it’s too cool, the chicken gets greasy. Aim for medium-high heat, around 350°F (175°C). This keeps the coating golden and crisp.
Presentation Ideas
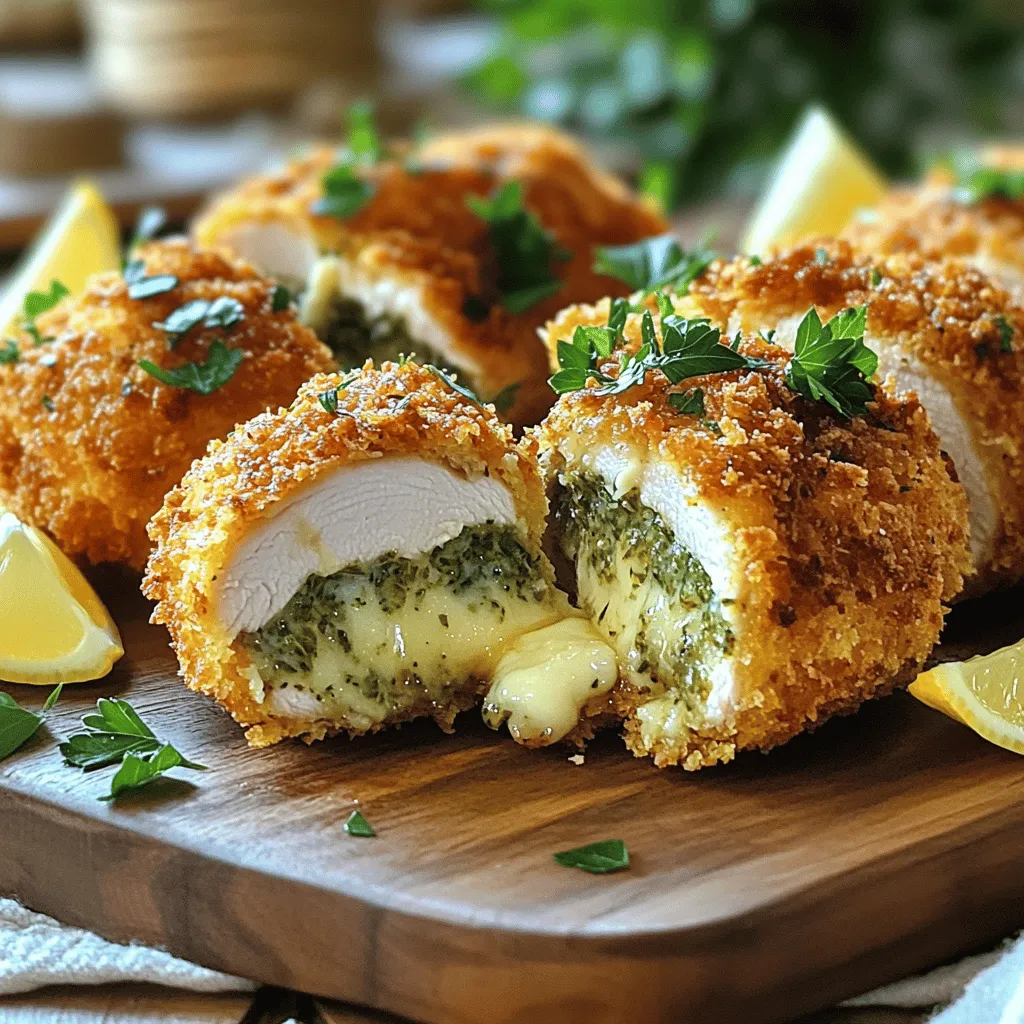
Serve your Chicken Kiev with fresh herbs and lemon wedges. This adds color and freshness to your plate. When you slice the chicken, do it diagonally. This way, you show off the melted herb butter inside. The warm butter will ooze out, making the dish look even more delicious. Enjoy your beautifully presented meal!
Variations
Herb Alternatives
You can change the herbs in your Chicken Kiev. Try using thyme or chives. These herbs add unique tastes. You can also add spices for extra flavor. A pinch of paprika or cayenne can make it spicy. For a fresh twist, consider lemon zest. This brightens the dish and adds zing. Feel free to mix and match herbs based on what you like.
Dietary Modifications
If you need to go gluten-free, replace regular breadcrumbs with gluten-free options. You can use almond flour or crushed cornflakes. These add a nice crunch too. For dairy-free cooking, try using plant-based butter. This keeps the herb butter rich and tasty without dairy. You can also use a dairy-free milk in the egg wash. It helps the breadcrumbs stick well.
Cooking Method Alternatives
You can cook Chicken Kiev in different ways. If you want a healthier option, bake it in the oven. Preheat the oven to 375°F (190°C). Place the breaded chicken on a baking sheet. Bake for about 25-30 minutes. This makes for a crispy outside and juicy inside without frying.
Another option is to use an air fryer. Set it to 380°F (193°C). Cook it for about 15-20 minutes. This method uses less oil but still gives a great crunch. Either method works well and keeps the chicken flavorful and juicy.
Storage Info
Storing Leftovers
To keep your cooked Chicken Kiev fresh, store it in the fridge. Place the chicken in an airtight container. This helps lock in moisture and flavor. Cooked Chicken Kiev stays good for about 3 to 4 days in the refrigerator. If you want to enjoy it later, freezing is a great option.
Freezing Instructions
You can freeze both cooked and uncooked Chicken Kiev. To freeze cooked Chicken Kiev, let it cool first. Wrap each piece tightly in plastic wrap. Then, place the wrapped chicken in a freezer bag. This way, it can last up to 3 months in the freezer. For uncooked chicken, follow the same wrapping method. Make sure to label the bags with the date. When you’re ready to eat, thaw chicken in the fridge overnight. This keeps it safe and tasty.
Reheating Methods
To reheat Chicken Kiev and keep it crispy, use the oven. Preheat your oven to 375°F (190°C). Place the chicken on a baking sheet. Heat for about 15-20 minutes until hot and crispy. If you prefer the microwave, do so with care. Place the chicken on a microwave-safe plate. Cover it with a paper towel to keep it moist. Heat on low power for 1-2 minutes. This method can make it softer, so the oven is best for crunch.
FAQs
Can I make Chicken Kiev ahead of time?
Yes, you can prep Chicken Kiev in advance. Here are some tips to make meal planning easier:
– Prepare the herb butter and freeze it. You can make it a few days ahead.
– Stuff the chicken and coat it with breadcrumbs. This can be done a day before cooking.
– Store the chicken in the fridge. Keep it in an airtight container to stay fresh.
Making Chicken Kiev ahead saves time on busy nights. Just fry it when you’re ready to eat.
What should I serve with Chicken Kiev?
Chicken Kiev pairs well with many side dishes. Here are some tasty ideas:
– Mashed potatoes: Creamy and buttery, they balance the crispy chicken.
– Steamed vegetables: Broccoli or green beans add color and nutrients.
– Rice pilaf: A light side that soaks up any herb butter.
– Salad: A fresh green salad with a light dressing helps cleanse your palate.
These sides make a complete meal and enhance the Chicken Kiev experience.
How do I know when the chicken is fully cooked?
To check if your chicken is done, use these simple tips:
– Use a meat thermometer: Insert it into the thickest part of the chicken. It should read 165°F (75°C).
– Check the juices: Cut into the chicken. If the juices run clear, it’s cooked.
– Look for color: The meat should no longer be pink inside.
These methods help you ensure a safe and delicious meal.
This blog post showed you how to make tasty Chicken Kiev. You learned about key ingredients like chicken and fresh herbs. I provided step-by-step instructions for preparing, stuffing, and frying. You also got tips for juicy chicken and crispy coating.
In the end, Chicken Kiev can impress at any meal. Try different herbs or cooking methods. Enjoy your cooking journey, and wow your friends and family with this dish!