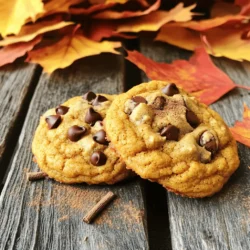
If you love cozy fall flavors, you need to try my Brown Butter Pumpkin Chocolate Chip Cookies! These treats are soft, chewy, and loaded with warm spices. The brown butter adds a nutty depth that makes each bite special. In this post, I will walk you through the ingredients, steps, and tips for baking them just right. Grab your mixing bowl, and let’s make a delicious batch together!
Ingredients
Complete Ingredient List
To make these brown butter pumpkin chocolate chip cookies, you will need:
– 1 cup unsalted butter (2 sticks)
– 1 cup pumpkin puree (canned or fresh)
– 1 cup brown sugar, packed
– 1/2 cup granulated sugar
– 1 large egg
– 2 teaspoons vanilla extract
– 2 cups all-purpose flour
– 1 teaspoon baking soda
– 1 teaspoon baking powder
– 1 teaspoon ground cinnamon
– 1/2 teaspoon ground nutmeg
– 1/4 teaspoon salt
– 1 cup semi-sweet chocolate chips
Importance of Each Ingredient
Each ingredient plays a key role in the cookie’s taste and texture.
– Unsalted butter: This adds a rich flavor and helps with browning. Brown butter enhances the nutty taste.
– Pumpkin puree: It gives moisture and a soft texture. Plus, it adds a warm, fall flavor.
– Brown sugar: This sugar adds sweetness and a chewy texture. It also enhances the caramel notes.
– Granulated sugar: This sugar helps the cookies spread and adds a light crunch.
– Egg: It binds the dough and adds moisture.
– Vanilla extract: This adds depth and a lovely aroma.
– All-purpose flour: It gives structure to the cookies.
– Baking soda and baking powder: These leavening agents help the cookies rise.
– Spices (cinnamon and nutmeg): These add warmth and flavor, making the cookies taste like fall.
– Salt: A small amount enhances all the flavors.
– Chocolate chips: They add sweetness and a decadent touch.
Possible Substitutions
If you need alternatives, here are some ideas:
– Butter: You can use coconut oil or margarine, but they change the flavor.
– Pumpkin puree: Applesauce or mashed banana can work in a pinch. They add moisture but will change the taste.
– Brown sugar: You can use white sugar, but the cookies will be less chewy.
– Gluten-free flour: If you need gluten-free options, use a 1:1 gluten-free flour blend.
– Chocolate chips: Try dark chocolate or white chocolate for a different taste.
These ingredients come together to create a cookie that is rich, soft, and bursting with flavor.
Step-by-Step Instructions
Preparing the Brown Butter
To start, you need to make the brown butter. This step adds a rich flavor to the cookies. Take a medium saucepan and melt 1 cup of unsalted butter over medium heat. Stir it often. You will notice the butter bubbling. After 5-7 minutes, it will turn golden brown. You’ll smell a nutty aroma too. This is when you know it’s ready. Remove the saucepan from heat and let it cool slightly.
Mixing Wet Ingredients
Next, grab a large mixing bowl. In this bowl, combine the browned butter with 1 cup of pumpkin puree, 1 cup of packed brown sugar, and 1/2 cup of granulated sugar. Mix these ingredients well until the mixture is smooth and creamy. It helps to use a whisk or a hand mixer for this part. Then, crack in 1 large egg and add 2 teaspoons of vanilla extract. Stir these in until everything is fully blended.
Combining Dry Ingredients and Baking
Now it’s time to mix the dry ingredients. In another bowl, whisk together 2 cups of all-purpose flour, 1 teaspoon of baking soda, 1 teaspoon of baking powder, 1 teaspoon of ground cinnamon, 1/2 teaspoon of ground nutmeg, and 1/4 teaspoon of salt. Gradually add this dry mix to the wet mixture, stirring gently until just combined. Be careful not to overmix. Finally, fold in 1 cup of semi-sweet chocolate chips.
After that, use a cookie scoop or tablespoon to drop rounded dough onto two prepared baking sheets. Space them about 2 inches apart. Bake these in your preheated oven at 350°F for 10-12 minutes. The edges should be lightly golden. The centers may look a bit under-baked. That’s okay; they will firm up as they cool. Let them cool on the baking sheets for 5 minutes before moving them to a wire rack to finish cooling completely.
Tips & Tricks
Achieving the Perfect Brown Butter
To make brown butter, you must melt unsalted butter in a saucepan. Use medium heat and stir often. Watch for the color change. The butter will turn golden brown and smell nutty. This step adds a rich flavor to your cookies. Make sure to remove it from heat right when it’s done. If you let it cook too long, it will burn and taste bitter.
Top Tips for Soft and Chewy Cookies
For soft and chewy cookies, do not overmix the dough. Mix until just combined. You can also chill the dough for about 30 minutes before baking. This helps the flavors meld and keeps your cookies thick. Using brown sugar adds moisture, which leads to a chewy texture. Always bake until the edges are lightly golden, and the centers look a bit soft.
Baking Time and Temperature Adjustments
Baking at 350°F (175°C) is perfect for these cookies. Bake them for 10 to 12 minutes. Keep an eye on them as they bake. Ovens can vary in temperature. If your cookies spread too much, try chilling the dough longer. If you want them a bit crispier, add a minute or two to the baking time. Always let them cool for five minutes on the sheet before moving them. This helps them firm up nicely.

Variations
Adding Nuts or Other Mix-Ins
You can make your cookies even better by adding nuts or other mix-ins. Walnuts or pecans add nice crunch. Use about 1 cup of chopped nuts for great flavor. Chocolate chunks can also replace some chocolate chips. Dried fruit like cranberries or raisins adds sweetness. These options make your cookies unique and fun.
Making It Gluten-Free
If you want gluten-free cookies, it’s easy! Just swap all-purpose flour for gluten-free flour. Look for blends that work well in baking. They should not have a strong flavor. Check that your baking powder and baking soda are gluten-free too. This way, everyone can enjoy these cookies.
Alternative Flavorings and Spices
You can change the taste of your cookies with different flavors. Try adding a bit of ginger or allspice for a warm twist. A splash of almond extract can also brighten the flavor. If you enjoy citrus, try adding orange or lemon zest. These small changes can make your cookies stand out.
Storage Info
Best Ways to Store Cookies
To keep your cookies fresh, let them cool completely first. Place them in an airtight container. You can store them at room temperature for up to five days. If you want them to last longer, try the fridge. Just remember to seal them well to avoid drying out.
Freezing Instructions
You can freeze these cookies for later enjoyment. After baking and cooling, place cookies in a single layer on a baking sheet. Freeze them for about one hour. Once frozen, transfer them to a freezer bag. They will stay fresh for up to three months. When you’re ready to enjoy, simply thaw them at room temperature.
Reheating for Freshness
To bring back that fresh-baked taste, reheat your cookies. Preheat your oven to 350°F (175°C). Place the cookies on a baking sheet and heat for about 5-7 minutes. This will make them warm and soft again. Enjoy them with a glass of milk or your favorite drink.
FAQs
How do I know when my cookies are done?
You can tell your cookies are done when the edges turn light golden brown. The center may look a bit soft but will firm up as they cool. Keep an eye on them, as baking times can vary. Don’t overbake!
Can I use a different type of chocolate?
Yes, you can use different types of chocolate. Dark chocolate or milk chocolate work well too. Just remember, the flavor will change a bit. Semi-sweet chocolate gives a nice balance with the pumpkin.
How long do the cookies last?
These cookies stay fresh for about a week when stored in an airtight container. If you want them to last longer, freeze them. They can stay in the freezer for up to three months. Just thaw them before enjoying!*
This article covered the key ingredients, steps, tips, and variations for making cookies. You learned about the importance of each ingredient and how to make perfect brown butter. The tips help you bake soft, chewy cookies every time. You can customize your cookies with nuts or different flavors. Finally, proper storage keeps them fresh longer. Now, you have all the knowledge to bake delicious cookies that impress everyone. Enjoy your baking adventure and share your tasty results!