![To make DIY Chocolate Blueberry Bark, gather these simple items: - 1 cup dark chocolate chips (or melts) - 1/2 cup dried blueberries - 1/4 cup chopped nuts (such as almonds or walnuts) - 2 tablespoons chia seeds - Sea salt for sprinkling For the best results, use a kitchen scale. This helps ensure you have the right amount of each ingredient. Use dry measuring cups for solids like nuts and dried fruit. For chocolate chips, a liquid measuring cup works well. If you don’t have a scale, level off each cup with a straight edge. This gives you an accurate measure. You can easily change up the recipe to fit your taste. Use milk chocolate if you prefer it sweeter. Instead of dried blueberries, try dried cranberries or cherries for a different flavor. If you have nut allergies, leave out the nuts or use seeds like sunflower seeds. You can also swap chia seeds with flaxseeds for some extra crunch. These simple changes keep the bark fun and tasty! Making DIY Chocolate Blueberry Bark is quick and fun! You need just a few steps. The whole process takes about 40 minutes, including time for the chocolate to set. This treat is simple, tasty, and perfect for sharing. 1. Prepare the Baking Sheet: Start by lining a baking sheet with parchment paper. This makes it easy to lift the bark later. 2. Melt the Chocolate: Place the dark chocolate chips in a microwave-safe bowl. Heat them in the microwave for 30 seconds. After 30 seconds, take the bowl out and stir the chocolate. Repeat until the chocolate is smooth and melted. Be careful not to overheat it; this can cause the chocolate to burn. 3. Mix In Ingredients: Once the chocolate is melted, add the dried blueberries, chopped nuts, and chia seeds. Stir well to coat all the ingredients with chocolate. 4. Spread Chocolate Mixture: Pour the chocolate mixture onto your baking sheet. Use a spatula to spread it evenly. Aim for a thickness of about 1/4 inch. 5. Add Finishing Touches: Lightly sprinkle sea salt over the top of the chocolate. This adds a nice flavor contrast and makes the bark even tastier. 6. Set the Bark: Place the baking sheet in the refrigerator. Let it chill for about 30 minutes or until the chocolate is hard and set. 7. Break into Pieces: After the chocolate is solid, take it out of the fridge. Break the bark into small, irregular pieces. This makes for a fun and rustic look. 8. Store: Store any leftover bark in an airtight container at room temperature. If you want it to last longer, keep it in the fridge. - Overheating the Chocolate: Watch the chocolate closely while melting. If it gets too hot, it can clump or burn. - Not Stirring Enough: Make sure to mix the dried fruits and nuts evenly into the chocolate. This helps every bite taste great. - Skipping Sea Salt: Don’t skip the sea salt! It enhances the flavors and makes the bark unique. Now you’re ready to make your own delicious DIY Chocolate Blueberry Bark! For the complete recipe, check out the [Full Recipe]. To get the best texture in your chocolate bark, choose high-quality dark chocolate. I prefer using chocolate chips or melts. They melt smoothly and set well. When you melt the chocolate, do it slowly in short bursts. This helps avoid burning the chocolate. Stir often to keep it creamy. After mixing in the other ingredients, spread the chocolate evenly. A thickness of about 1/4 inch works best. This gives a nice snap when you break it. To make your bark more flavorful, add a pinch of sea salt. It balances the sweetness. You can also try adding spices like cinnamon or a splash of vanilla extract. If you want more crunch, use different nuts. Try almonds, walnuts, or even pistachios. Each nut brings its own taste to the bark. Dried fruits like cranberries or cherries can add a twist too. Each addition creates a unique flavor experience. Make your bark look great! Serve it on a colorful plate. A glass jar tied with twine also looks nice. Fresh blueberries around the bark add color and freshness. You can even drizzle some melted chocolate over the top for style. These touches make your treat more inviting. This way, it’s not just tasty but also pretty to look at! {{image_2}} You can swap some ingredients in the DIY Chocolate Blueberry Bark. Here are a few ideas: - Use white chocolate chips instead of dark chocolate for a sweeter taste. - Try dried cranberries or cherries for a different fruit flavor. - Substitute seeds for nuts if you want a nut-free option. Mixing flavors can make your bark unique. Here are some tasty combos: - Add orange zest for a zesty touch. - Use mint extract for a refreshing kick. - Sprinkle in some cinnamon for warmth and spice. You can adjust the recipe to fit different diets: - For a vegan version, use dairy-free chocolate. - Make it gluten-free by ensuring all ingredients are certified gluten-free. - Use sugar-free chocolate for a low-sugar treat. These variations let you create a bark that suits your taste and needs. Check the Full Recipe for more details on making this tasty treat! To keep your DIY chocolate blueberry bark fresh, store it in an airtight container. This helps prevent moisture and keeps the bark crunchy. You can place the container in a cool, dry place, like a pantry. If you live in a warm area, consider keeping it in the fridge. It helps maintain the texture and taste. When stored properly, your chocolate bark lasts about two weeks. You might notice it stays fresh for longer if kept in the fridge. Just remember, the longer it sits, the more it may lose its snap. So, enjoy it while it’s fresh! If your chocolate bark becomes a bit soft, you can refresh it. Simply place it in the fridge for a short time to firm it up. Avoid reheating, as it may melt the chocolate. Instead, keep it cool and let it restore its crunch in the fridge. Yes, you can use white chocolate. It gives a sweeter taste. The look will change too. White chocolate has a creamy flavor that pairs well with blueberries. If you love white chocolate, go for it! Just melt it the same way as dark chocolate. The bark lasts about two weeks. Store it in an airtight container. Keep it in a cool, dry place. If you want it to last longer, put it in the fridge. Absolutely! You can add dried cranberries, cherries, or apricots. Each fruit brings a unique flavor. Just make sure to chop larger pieces smaller. This keeps the bark even and tasty. The recipe is not vegan with dark chocolate. Most dark chocolate has milk solids. To make it vegan, use dairy-free chocolate chips. This way, you enjoy the bark without any animal products. Check labels to ensure they fit your needs. For the full recipe, check the earlier section. This blog post covered essential ingredients for your recipe, with tips on measurements and substitutions. You learned step-by-step instructions and common mistakes to avoid. Plus, we shared ways to enhance flavor and improve presentation. You discovered fun variations and how to store your creation properly. With these insights, you can now confidently make your treat. Remember, practice will help you master this recipe. Enjoy creating delicious bites that impress everyone!](https://flavorsprint.com/wp-content/uploads/2025/06/ca01726d-a6e6-453a-8ffb-9a3c00dd5b03-768x768.webp)
If you crave a fun and tasty treat, DIY Chocolate Blueberry Bark is for you! This simple recipe combines sweet chocolate and juicy blueberries for a snack you can make at home. In just a few easy steps, you’ll create a dessert that looks great and tastes even better. By the end, you’ll have a delightful treat to share with friends or enjoy on your own! Let’s get started!
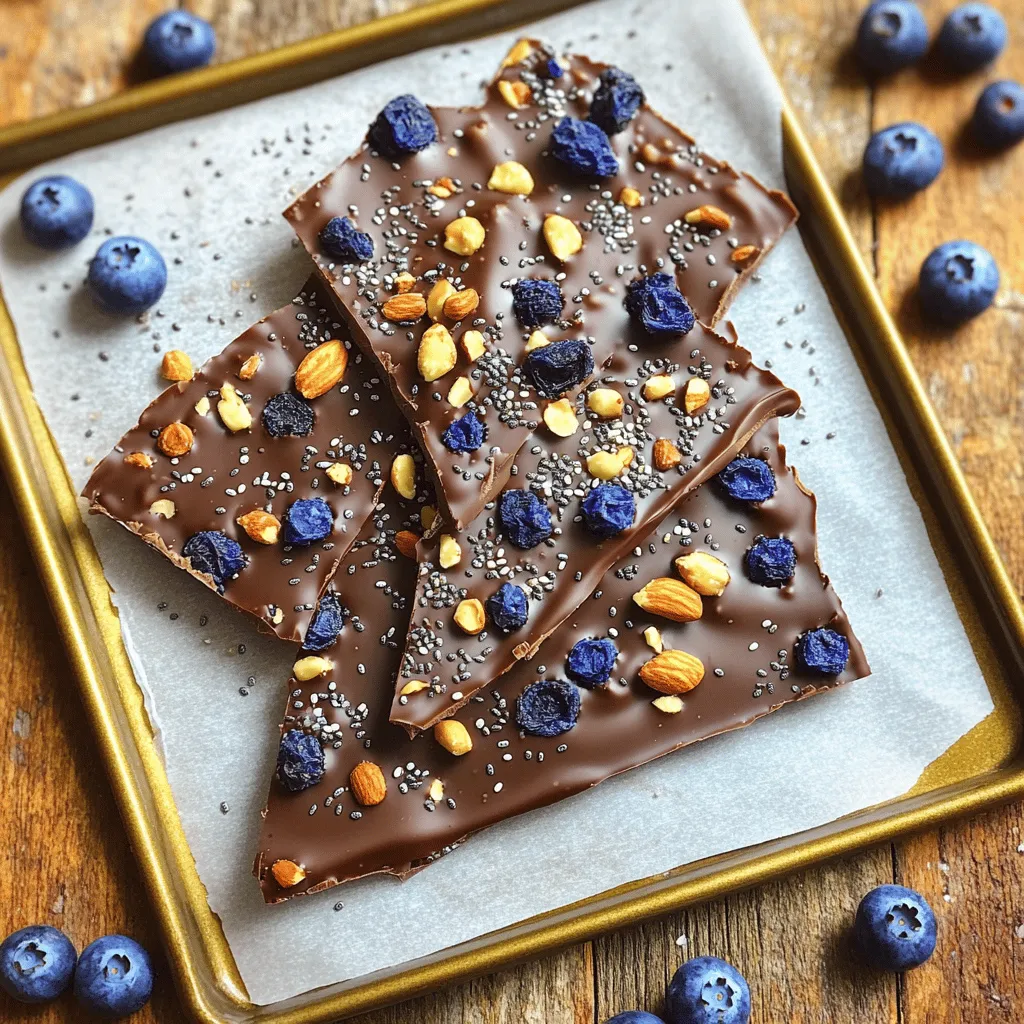
Ingredients
List of Ingredients
To make DIY Chocolate Blueberry Bark, gather these simple items:
– 1 cup dark chocolate chips (or melts)
– 1/2 cup dried blueberries
– 1/4 cup chopped nuts (such as almonds or walnuts)
– 2 tablespoons chia seeds
– Sea salt for sprinkling
Measurement Tips
For the best results, use a kitchen scale. This helps ensure you have the right amount of each ingredient. Use dry measuring cups for solids like nuts and dried fruit. For chocolate chips, a liquid measuring cup works well. If you don’t have a scale, level off each cup with a straight edge. This gives you an accurate measure.
Ingredient Substitutions
You can easily change up the recipe to fit your taste. Use milk chocolate if you prefer it sweeter. Instead of dried blueberries, try dried cranberries or cherries for a different flavor. If you have nut allergies, leave out the nuts or use seeds like sunflower seeds. You can also swap chia seeds with flaxseeds for some extra crunch. These simple changes keep the bark fun and tasty!
Step-by-Step Instructions
Preparation Overview
Making DIY Chocolate Blueberry Bark is quick and fun! You need just a few steps. The whole process takes about 40 minutes, including time for the chocolate to set. This treat is simple, tasty, and perfect for sharing.
Detailed Method for Each Step
1. Prepare the Baking Sheet: Start by lining a baking sheet with parchment paper. This makes it easy to lift the bark later.
2. Melt the Chocolate: Place the dark chocolate chips in a microwave-safe bowl. Heat them in the microwave for 30 seconds. After 30 seconds, take the bowl out and stir the chocolate. Repeat until the chocolate is smooth and melted. Be careful not to overheat it; this can cause the chocolate to burn.
3. Mix In Ingredients: Once the chocolate is melted, add the dried blueberries, chopped nuts, and chia seeds. Stir well to coat all the ingredients with chocolate.
4. Spread Chocolate Mixture: Pour the chocolate mixture onto your baking sheet. Use a spatula to spread it evenly. Aim for a thickness of about 1/4 inch.
5. Add Finishing Touches: Lightly sprinkle sea salt over the top of the chocolate. This adds a nice flavor contrast and makes the bark even tastier.
6. Set the Bark: Place the baking sheet in the refrigerator. Let it chill for about 30 minutes or until the chocolate is hard and set.
7. Break into Pieces: After the chocolate is solid, take it out of the fridge. Break the bark into small, irregular pieces. This makes for a fun and rustic look.
8. Store: Store any leftover bark in an airtight container at room temperature. If you want it to last longer, keep it in the fridge.
Common Mistakes to Avoid
– Overheating the Chocolate: Watch the chocolate closely while melting. If it gets too hot, it can clump or burn.
– Not Stirring Enough: Make sure to mix the dried fruits and nuts evenly into the chocolate. This helps every bite taste great.
– Skipping Sea Salt: Don’t skip the sea salt! It enhances the flavors and makes the bark unique.
Now you’re ready to make your own delicious DIY Chocolate Blueberry Bark!
Tips & Tricks
Perfecting the Texture
To get the best texture in your chocolate bark, choose high-quality dark chocolate. I prefer using chocolate chips or melts. They melt smoothly and set well. When you melt the chocolate, do it slowly in short bursts. This helps avoid burning the chocolate. Stir often to keep it creamy. After mixing in the other ingredients, spread the chocolate evenly. A thickness of about 1/4 inch works best. This gives a nice snap when you break it.
Enhancing Flavor Profiles
To make your bark more flavorful, add a pinch of sea salt. It balances the sweetness. You can also try adding spices like cinnamon or a splash of vanilla extract. If you want more crunch, use different nuts. Try almonds, walnuts, or even pistachios. Each nut brings its own taste to the bark. Dried fruits like cranberries or cherries can add a twist too. Each addition creates a unique flavor experience.
Presentation Suggestions
Make your bark look great! Serve it on a colorful plate. A glass jar tied with twine also looks nice. Fresh blueberries around the bark add color and freshness. You can even drizzle some melted chocolate over the top for style. These touches make your treat more inviting. This way, it’s not just tasty but also pretty to look at!
Variations
Alternative Ingredients
You can swap some ingredients in the DIY Chocolate Blueberry Bark. Here are a few ideas:
– Use white chocolate chips instead of dark chocolate for a sweeter taste.
– Try dried cranberries or cherries for a different fruit flavor.
– Substitute seeds for nuts if you want a nut-free option.
Flavor Combinations
Mixing flavors can make your bark unique. Here are some tasty combos:
– Add orange zest for a zesty touch.
– Use mint extract for a refreshing kick.
– Sprinkle in some cinnamon for warmth and spice.
Dietary Adjustments
You can adjust the recipe to fit different diets:
– For a vegan version, use dairy-free chocolate.
– Make it gluten-free by ensuring all ingredients are certified gluten-free.
– Use sugar-free chocolate for a low-sugar treat.
These variations let you create a bark that suits your taste and needs.
Storage Info
Best Storage Practices
To keep your DIY chocolate blueberry bark fresh, store it in an airtight container. This helps prevent moisture and keeps the bark crunchy. You can place the container in a cool, dry place, like a pantry. If you live in a warm area, consider keeping it in the fridge. It helps maintain the texture and taste.
Shelf Life
When stored properly, your chocolate bark lasts about two weeks. You might notice it stays fresh for longer if kept in the fridge. Just remember, the longer it sits, the more it may lose its snap. So, enjoy it while it’s fresh!
Reheating or Refreshing Tips
If your chocolate bark becomes a bit soft, you can refresh it. Simply place it in the fridge for a short time to firm it up. Avoid reheating, as it may melt the chocolate. Instead, keep it cool and let it restore its crunch in the fridge.
FAQs
Can I use white chocolate instead of dark?
Yes, you can use white chocolate. It gives a sweeter taste. The look will change too. White chocolate has a creamy flavor that pairs well with blueberries. If you love white chocolate, go for it! Just melt it the same way as dark chocolate.
How long will the bark last?
The bark lasts about two weeks. Store it in an airtight container. Keep it in a cool, dry place. If you want it to last longer, put it in the fridge.
Can I add other types of dried fruit?
Absolutely! You can add dried cranberries, cherries, or apricots. Each fruit brings a unique flavor. Just make sure to chop larger pieces smaller. This keeps the bark even and tasty.
Is this recipe vegan-friendly?
The recipe is not vegan with dark chocolate. Most dark chocolate has milk solids. To make it vegan, use dairy-free chocolate chips. This way, you enjoy the bark without any animal products. Check labels to ensure they fit your needs.
This blog post covered essential ingredients for your recipe, with tips on measurements and substitutions. You learned step-by-step instructions and common mistakes to avoid. Plus, we shared ways to enhance flavor and improve presentation. You discovered fun variations and how to store your creation properly. With these insights, you can now confidently make your treat. Remember, practice will help you master this recipe. Enjoy creating delicious bites that impress everyone!
![To make DIY Chocolate Blueberry Bark, gather these simple items: - 1 cup dark chocolate chips (or melts) - 1/2 cup dried blueberries - 1/4 cup chopped nuts (such as almonds or walnuts) - 2 tablespoons chia seeds - Sea salt for sprinkling For the best results, use a kitchen scale. This helps ensure you have the right amount of each ingredient. Use dry measuring cups for solids like nuts and dried fruit. For chocolate chips, a liquid measuring cup works well. If you don’t have a scale, level off each cup with a straight edge. This gives you an accurate measure. You can easily change up the recipe to fit your taste. Use milk chocolate if you prefer it sweeter. Instead of dried blueberries, try dried cranberries or cherries for a different flavor. If you have nut allergies, leave out the nuts or use seeds like sunflower seeds. You can also swap chia seeds with flaxseeds for some extra crunch. These simple changes keep the bark fun and tasty! Making DIY Chocolate Blueberry Bark is quick and fun! You need just a few steps. The whole process takes about 40 minutes, including time for the chocolate to set. This treat is simple, tasty, and perfect for sharing. 1. Prepare the Baking Sheet: Start by lining a baking sheet with parchment paper. This makes it easy to lift the bark later. 2. Melt the Chocolate: Place the dark chocolate chips in a microwave-safe bowl. Heat them in the microwave for 30 seconds. After 30 seconds, take the bowl out and stir the chocolate. Repeat until the chocolate is smooth and melted. Be careful not to overheat it; this can cause the chocolate to burn. 3. Mix In Ingredients: Once the chocolate is melted, add the dried blueberries, chopped nuts, and chia seeds. Stir well to coat all the ingredients with chocolate. 4. Spread Chocolate Mixture: Pour the chocolate mixture onto your baking sheet. Use a spatula to spread it evenly. Aim for a thickness of about 1/4 inch. 5. Add Finishing Touches: Lightly sprinkle sea salt over the top of the chocolate. This adds a nice flavor contrast and makes the bark even tastier. 6. Set the Bark: Place the baking sheet in the refrigerator. Let it chill for about 30 minutes or until the chocolate is hard and set. 7. Break into Pieces: After the chocolate is solid, take it out of the fridge. Break the bark into small, irregular pieces. This makes for a fun and rustic look. 8. Store: Store any leftover bark in an airtight container at room temperature. If you want it to last longer, keep it in the fridge. - Overheating the Chocolate: Watch the chocolate closely while melting. If it gets too hot, it can clump or burn. - Not Stirring Enough: Make sure to mix the dried fruits and nuts evenly into the chocolate. This helps every bite taste great. - Skipping Sea Salt: Don’t skip the sea salt! It enhances the flavors and makes the bark unique. Now you’re ready to make your own delicious DIY Chocolate Blueberry Bark! For the complete recipe, check out the [Full Recipe]. To get the best texture in your chocolate bark, choose high-quality dark chocolate. I prefer using chocolate chips or melts. They melt smoothly and set well. When you melt the chocolate, do it slowly in short bursts. This helps avoid burning the chocolate. Stir often to keep it creamy. After mixing in the other ingredients, spread the chocolate evenly. A thickness of about 1/4 inch works best. This gives a nice snap when you break it. To make your bark more flavorful, add a pinch of sea salt. It balances the sweetness. You can also try adding spices like cinnamon or a splash of vanilla extract. If you want more crunch, use different nuts. Try almonds, walnuts, or even pistachios. Each nut brings its own taste to the bark. Dried fruits like cranberries or cherries can add a twist too. Each addition creates a unique flavor experience. Make your bark look great! Serve it on a colorful plate. A glass jar tied with twine also looks nice. Fresh blueberries around the bark add color and freshness. You can even drizzle some melted chocolate over the top for style. These touches make your treat more inviting. This way, it’s not just tasty but also pretty to look at! {{image_2}} You can swap some ingredients in the DIY Chocolate Blueberry Bark. Here are a few ideas: - Use white chocolate chips instead of dark chocolate for a sweeter taste. - Try dried cranberries or cherries for a different fruit flavor. - Substitute seeds for nuts if you want a nut-free option. Mixing flavors can make your bark unique. Here are some tasty combos: - Add orange zest for a zesty touch. - Use mint extract for a refreshing kick. - Sprinkle in some cinnamon for warmth and spice. You can adjust the recipe to fit different diets: - For a vegan version, use dairy-free chocolate. - Make it gluten-free by ensuring all ingredients are certified gluten-free. - Use sugar-free chocolate for a low-sugar treat. These variations let you create a bark that suits your taste and needs. Check the Full Recipe for more details on making this tasty treat! To keep your DIY chocolate blueberry bark fresh, store it in an airtight container. This helps prevent moisture and keeps the bark crunchy. You can place the container in a cool, dry place, like a pantry. If you live in a warm area, consider keeping it in the fridge. It helps maintain the texture and taste. When stored properly, your chocolate bark lasts about two weeks. You might notice it stays fresh for longer if kept in the fridge. Just remember, the longer it sits, the more it may lose its snap. So, enjoy it while it’s fresh! If your chocolate bark becomes a bit soft, you can refresh it. Simply place it in the fridge for a short time to firm it up. Avoid reheating, as it may melt the chocolate. Instead, keep it cool and let it restore its crunch in the fridge. Yes, you can use white chocolate. It gives a sweeter taste. The look will change too. White chocolate has a creamy flavor that pairs well with blueberries. If you love white chocolate, go for it! Just melt it the same way as dark chocolate. The bark lasts about two weeks. Store it in an airtight container. Keep it in a cool, dry place. If you want it to last longer, put it in the fridge. Absolutely! You can add dried cranberries, cherries, or apricots. Each fruit brings a unique flavor. Just make sure to chop larger pieces smaller. This keeps the bark even and tasty. The recipe is not vegan with dark chocolate. Most dark chocolate has milk solids. To make it vegan, use dairy-free chocolate chips. This way, you enjoy the bark without any animal products. Check labels to ensure they fit your needs. For the full recipe, check the earlier section. This blog post covered essential ingredients for your recipe, with tips on measurements and substitutions. You learned step-by-step instructions and common mistakes to avoid. Plus, we shared ways to enhance flavor and improve presentation. You discovered fun variations and how to store your creation properly. With these insights, you can now confidently make your treat. Remember, practice will help you master this recipe. Enjoy creating delicious bites that impress everyone!](https://flavorsprint.com/wp-content/uploads/2025/06/ca01726d-a6e6-453a-8ffb-9a3c00dd5b03-250x250.webp)
