No Bake Oreo Cheesecake Delightful and Easy Recipe

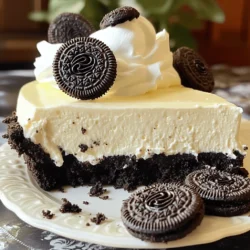
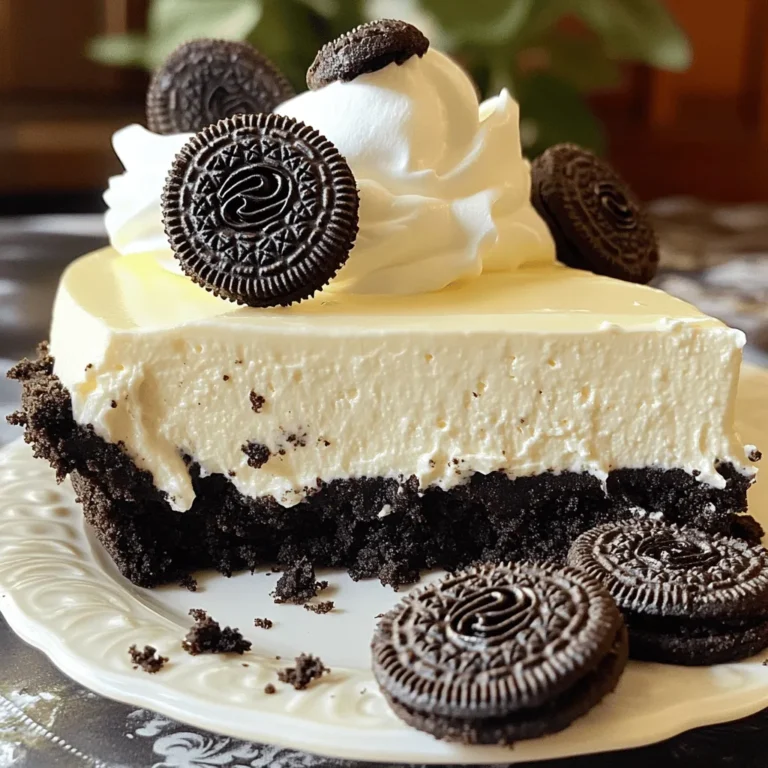
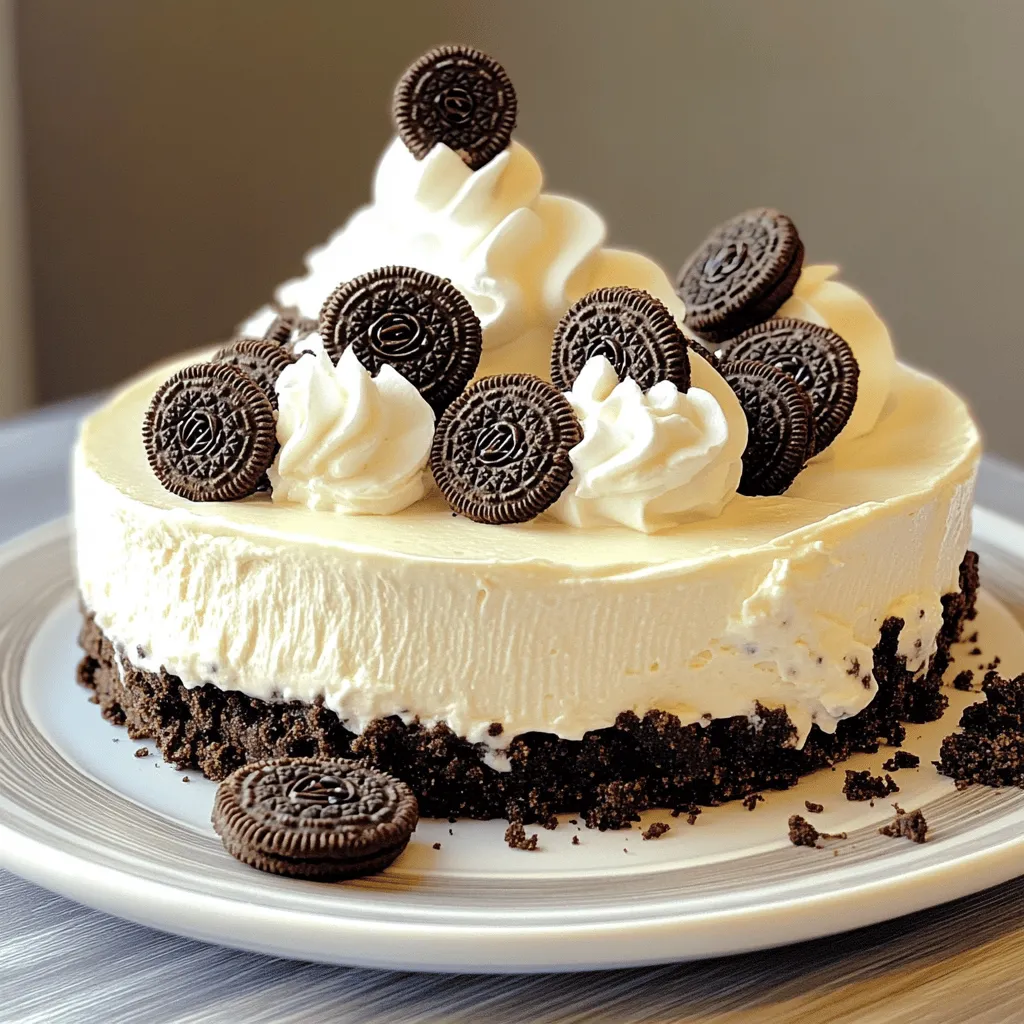
Are you ready to indulge in a creamy, dream-like dessert? This No Bake Oreo Cheesecake is your answer! It’s simple, delicious, and perfect for any occasion. You only need a few easy ingredients and no oven is required. Join me as we dive into this delightful recipe that will impress your friends and family. Trust me, once you taste this cheesecake, you won’t want to share it!

Ingredients

List of Ingredients

– 24 Oreo cookies, crushed

– 1/4 cup unsalted butter, melted

– 16 oz cream cheese, softened

– 1/2 cup powdered sugar

– 1 teaspoon vanilla extract

– 2 cups whipped cream (or 1 1/2 cups heavy cream whipped to soft peaks)

– 10 Oreo cookies, chopped for filling

– Extra Oreo cookies for garnish

Ingredient Notes

Quality of ingredients

Using fresh, high-quality ingredients makes a big difference. The cream cheese should be soft and at room temperature. This helps it mix smoothly. Always choose good brands of whipped cream for the best texture and taste.

Substitutions for dietary needs

If you need a gluten-free option, use gluten-free Oreo cookies. For a vegan version, look for plant-based cream cheese and whipped cream. This keeps the flavor while meeting dietary needs. Enjoy the same great taste with these swaps!

Step-by-Step Instructions

Preparing the Crust

To make the crust, you need to mix the crushed Oreo cookies with melted butter. Use a medium bowl for this. Stir until the cookies are fully coated in butter. This will help the crust hold together nicely.

Next, you need to press this mixture firmly into the bottom of a 9-inch springform pan. Make sure it is even and packed tight. This step gives your cheesecake a solid base.

Making the Cheesecake Filling

Now, let’s move on to the filling. In a mixing bowl, beat the softened cream cheese until it is smooth and creamy. This step is key for a silky texture.

Gradually add the powdered sugar and vanilla extract to the cream cheese. Keep mixing until well combined. This will sweeten the filling and add flavor.

Then, gently fold in the whipped cream. This step makes the filling light and fluffy. Be careful not to deflate the whipped cream too much.

Finally, stir in the chopped Oreo cookies. This adds a nice crunch to the filling.

Assembling the Cheesecake

Now it’s time to put it all together. Pour the cheesecake filling over the prepared crust in the springform pan. Use a spatula to spread it evenly.

Cover the cheesecake with plastic wrap. Refrigerate for at least 4 hours, or overnight for the best results. This helps it set properly and makes slicing easier later.

Once set, carefully remove the sides of the springform pan. You can now garnish the top with extra Oreo cookies. Use whole or crushed cookies as a fun topping.

For the full recipe, check the details provided earlier. Enjoy your delicious No Bake Oreo Cheesecake!

Tips & Tricks

Achieving the Perfect Texture

To get the best texture for your cheesecake, start with room temperature cream cheese. Cold cream cheese can create lumps, which you don’t want. Let it sit out for about 30 minutes before mixing. It makes a big difference!

Next, handle the whipped cream gently. When you fold it into the cream cheese mixture, do it slowly. This keeps your cheesecake light and airy. If you mix too hard, the air bubbles pop, and your cheesecake won’t be as fluffy.

Time-Saving Tips

Want to save time? Use store-bought whipped cream. It’s quick and easy. Just make sure to get a good quality one for the best taste.

You can also prepare the cheesecake a day ahead. This gives the flavors time to blend. Plus, it allows the cheesecake to set up perfectly in the fridge.

Presentation Tips

For a beautiful presentation, serve slices on dessert plates. Add a dollop of whipped cream and a mini Oreo on top. It looks fancy and tastes amazing!

Get creative with your decorating. Try drizzling chocolate sauce or adding fresh berries around the cheesecake. These touches can make your dessert even more inviting.

Check out the Full Recipe for more details and enjoy making this No Bake Oreo Cheesecake!

Variations

Flavor Variations

You can make this no bake Oreo cheesecake even more fun! Try using different cookie types for the crust. Chocolate chip cookies give a sweet twist. Peanut butter cookies add a nutty flavor that pairs well with cream cheese. You can also infuse the filling with flavors like mint or coffee. Just add a bit of mint extract or espresso powder to the cream cheese mix. This small change creates a whole new dessert experience.

Dietary Modifications

If you need gluten-free options, use gluten-free Oreo cookies. They work just as well and keep the same great taste. For those who follow a vegan diet, you can swap the cream cheese with a vegan cream cheese alternative. Use coconut cream or whipped coconut milk in place of the whipped cream. These swaps keep the creamy texture while meeting dietary needs.

Mini Cheesecakes

Want to serve these as mini cheesecakes? It’s simple! Use a muffin tin or small jars to create individual servings. Adjust the crust by using fewer cookies per serving, about 2 to 3 Oreos should do. The filling amount should also be smaller, about 1/4 cup per mini cheesecake. These mini versions only need about 2 to 3 hours to chill. They make a great treat for parties or gatherings. For the full recipe, check out the link provided.

Storage Info

How to Store Leftovers

To keep your No Bake Oreo Cheesecake fresh, use an airtight container. This helps prevent it from drying out. You can also cover the cheesecake with plastic wrap, ensuring it touches the surface. This keeps moisture in and flavors intact. Store it in the fridge, where it stays cool and tasty.

Freezing Recommendations

If you want to freeze the cheesecake, slice it first. Wrap each slice in plastic wrap. Then place the slices in a freezer-safe bag. This way, you can enjoy it later. To thaw, move the slices to the fridge. Let them sit for a few hours or overnight for the best results. This keeps the cheesecake creamy and delicious.

Shelf Life

In the fridge, your cheesecake lasts about 5 days. Always check for signs of spoilage. If it smells off or has a strange texture, it’s best to toss it out. Freshness is key to enjoying this treat. Store it properly, and you can savor it for days!

FAQs

Can I make No Bake Oreo Cheesecake in advance?

Yes, you can make No Bake Oreo Cheesecake ahead of time. I often prepare it a day before serving. This allows the flavors to blend well. Try to let it chill for at least four hours. For the best taste, overnight is even better. Just cover it tightly to keep it fresh.

Can I substitute the cream cheese?

Yes, there are great alternatives to cream cheese. You can use mascarpone cheese for a milder taste. Greek yogurt works well too, giving a tangy flavor. For a dairy-free option, try cashew cream or coconut cream. Just keep in mind that these substitutes may change the texture a bit.

How long can No Bake Oreo Cheesecake sit out?

No Bake Oreo Cheesecake can sit out for about two hours. After that, it should go back in the fridge to stay safe. If the room is warm, keep it chilled to avoid spoilage. Always check for any signs of spoilage before serving. Enjoy it cold for the best taste!

In this blog post, I covered how to make a No Bake Oreo Cheesecake. We explored the key ingredients, like Oreo cookies and cream cheese. I also shared step-by-step instructions to help you achieve the perfect texture and save time. You can customize this dessert with different flavors or dietary options. Finally, I provided useful storage tips to keep your cheesecake fresh. Enjoy making this delightful treat; it’s simple and delicious. Trust me, everyone will love it!

- 24 Oreo cookies, crushed - 1/4 cup unsalted butter, melted - 16 oz cream cheese, softened - 1/2 cup powdered sugar - 1 teaspoon vanilla extract - 2 cups whipped cream (or 1 1/2 cups heavy cream whipped to soft peaks) - 10 Oreo cookies, chopped for filling - Extra Oreo cookies for garnish Quality of ingredients Using fresh, high-quality ingredients makes a big difference. The cream cheese should be soft and at room temperature. This helps it mix smoothly. Always choose good brands of whipped cream for the best texture and taste. Substitutions for dietary needs If you need a gluten-free option, use gluten-free Oreo cookies. For a vegan version, look for plant-based cream cheese and whipped cream. This keeps the flavor while meeting dietary needs. Enjoy the same great taste with these swaps! To make the crust, you need to mix the crushed Oreo cookies with melted butter. Use a medium bowl for this. Stir until the cookies are fully coated in butter. This will help the crust hold together nicely. Next, you need to press this mixture firmly into the bottom of a 9-inch springform pan. Make sure it is even and packed tight. This step gives your cheesecake a solid base. Now, let’s move on to the filling. In a mixing bowl, beat the softened cream cheese until it is smooth and creamy. This step is key for a silky texture. Gradually add the powdered sugar and vanilla extract to the cream cheese. Keep mixing until well combined. This will sweeten the filling and add flavor. Then, gently fold in the whipped cream. This step makes the filling light and fluffy. Be careful not to deflate the whipped cream too much. Finally, stir in the chopped Oreo cookies. This adds a nice crunch to the filling. Now it’s time to put it all together. Pour the cheesecake filling over the prepared crust in the springform pan. Use a spatula to spread it evenly. Cover the cheesecake with plastic wrap. Refrigerate for at least 4 hours, or overnight for the best results. This helps it set properly and makes slicing easier later. Once set, carefully remove the sides of the springform pan. You can now garnish the top with extra Oreo cookies. Use whole or crushed cookies as a fun topping. For the full recipe, check the details provided earlier. Enjoy your delicious No Bake Oreo Cheesecake! To get the best texture for your cheesecake, start with room temperature cream cheese. Cold cream cheese can create lumps, which you don’t want. Let it sit out for about 30 minutes before mixing. It makes a big difference! Next, handle the whipped cream gently. When you fold it into the cream cheese mixture, do it slowly. This keeps your cheesecake light and airy. If you mix too hard, the air bubbles pop, and your cheesecake won’t be as fluffy. Want to save time? Use store-bought whipped cream. It’s quick and easy. Just make sure to get a good quality one for the best taste. You can also prepare the cheesecake a day ahead. This gives the flavors time to blend. Plus, it allows the cheesecake to set up perfectly in the fridge. For a beautiful presentation, serve slices on dessert plates. Add a dollop of whipped cream and a mini Oreo on top. It looks fancy and tastes amazing! Get creative with your decorating. Try drizzling chocolate sauce or adding fresh berries around the cheesecake. These touches can make your dessert even more inviting. Check out the Full Recipe for more details and enjoy making this No Bake Oreo Cheesecake! {{image_2}} You can make this no bake Oreo cheesecake even more fun! Try using different cookie types for the crust. Chocolate chip cookies give a sweet twist. Peanut butter cookies add a nutty flavor that pairs well with cream cheese. You can also infuse the filling with flavors like mint or coffee. Just add a bit of mint extract or espresso powder to the cream cheese mix. This small change creates a whole new dessert experience. If you need gluten-free options, use gluten-free Oreo cookies. They work just as well and keep the same great taste. For those who follow a vegan diet, you can swap the cream cheese with a vegan cream cheese alternative. Use coconut cream or whipped coconut milk in place of the whipped cream. These swaps keep the creamy texture while meeting dietary needs. Want to serve these as mini cheesecakes? It’s simple! Use a muffin tin or small jars to create individual servings. Adjust the crust by using fewer cookies per serving, about 2 to 3 Oreos should do. The filling amount should also be smaller, about 1/4 cup per mini cheesecake. These mini versions only need about 2 to 3 hours to chill. They make a great treat for parties or gatherings. For the full recipe, check out the link provided. To keep your No Bake Oreo Cheesecake fresh, use an airtight container. This helps prevent it from drying out. You can also cover the cheesecake with plastic wrap, ensuring it touches the surface. This keeps moisture in and flavors intact. Store it in the fridge, where it stays cool and tasty. If you want to freeze the cheesecake, slice it first. Wrap each slice in plastic wrap. Then place the slices in a freezer-safe bag. This way, you can enjoy it later. To thaw, move the slices to the fridge. Let them sit for a few hours or overnight for the best results. This keeps the cheesecake creamy and delicious. In the fridge, your cheesecake lasts about 5 days. Always check for signs of spoilage. If it smells off or has a strange texture, it’s best to toss it out. Freshness is key to enjoying this treat. Store it properly, and you can savor it for days! Yes, you can make No Bake Oreo Cheesecake ahead of time. I often prepare it a day before serving. This allows the flavors to blend well. Try to let it chill for at least four hours. For the best taste, overnight is even better. Just cover it tightly to keep it fresh. Yes, there are great alternatives to cream cheese. You can use mascarpone cheese for a milder taste. Greek yogurt works well too, giving a tangy flavor. For a dairy-free option, try cashew cream or coconut cream. Just keep in mind that these substitutes may change the texture a bit. No Bake Oreo Cheesecake can sit out for about two hours. After that, it should go back in the fridge to stay safe. If the room is warm, keep it chilled to avoid spoilage. Always check for any signs of spoilage before serving. Enjoy it cold for the best taste! In this blog post, I covered how to make a No Bake Oreo Cheesecake. We explored the key ingredients, like Oreo cookies and cream cheese. I also shared step-by-step instructions to help you achieve the perfect texture and save time. You can customize this dessert with different flavors or dietary options. Finally, I provided useful storage tips to keep your cheesecake fresh. Enjoy making this delightful treat; it’s simple and delicious. Trust me, everyone will love it!

No Bake Oreo Cheesecake

Indulge in the ultimate No Bake Oreo Cheesecake that's simply irresistible! With just a few easy ingredients, you can create a creamy, dreamy dessert perfect for any occasion. This recipe features a rich Oreo crust, fluffy cream cheese filling, and delightful chunks of Oreo cookies for added texture. Don't miss out on the fun—click through to discover the full recipe and learn how to impress your friends and family with this delicious treat!

Ingredients
  

24 Oreo cookies, crushed

1/4 cup unsalted butter, melted

16 oz cream cheese, softened

1/2 cup powdered sugar

1 teaspoon vanilla extract

2 cups whipped cream (or 1 1/2 cups heavy cream whipped to soft peaks)

10 Oreo cookies, chopped for filling

Extra Oreo cookies for garnish

Instructions
 

Start by combining the crushed Oreo cookies and melted butter in a medium bowl. Mix until the cookies are fully coated.

    Press the mixture firmly into the bottom of a 9-inch springform pan to create the crust. Set aside.

      In a mixing bowl, beat the softened cream cheese with an electric mixer until smooth and creamy.

        Gradually add the powdered sugar and vanilla extract to the cream cheese, continuing to beat until well combined.

          Gently fold in the whipped cream until the mixture is light and fluffy. Make sure not to deflate the whipped cream too much.

            Stir in the chopped Oreo cookies to the cheesecake filling.

              Pour the cheesecake filling over the prepared crust in the springform pan, spreading it evenly with a spatula.

                Cover the cheesecake with plastic wrap and refrigerate for at least 4 hours, or overnight for best results.

                  Once set, carefully remove the sides of the springform pan to reveal the cheesecake.

                    Garnish the top with extra Oreo cookies, either whole or crushed, before slicing and serving.

                      Prep Time: 20 minutes | Total Time: 4 hours | Servings: 8-10

                        - Presentation Tips: Serve slices on dessert plates with a dollop of whipped cream and a mini Oreo on top for an extra special touch.

                          Leave a Comment

                          Recipe Rating